In this blog post we will take a look at Microsoft Entra ID, Global Secure Access, focusing on the Internet access capability of this technology. We will step through what its capabilities are, deploy and test within a test environment.
Global Secure Access Overview
Microsoft Entra Glocal Secure Access – Internet Access is one part of the Microsoft Security Service Edge (SSE) solution. The other being Microsoft Entra Private Access. Designed for the modern era of working, SSE provides an identity-aware cloud-first network perimeter solution to meet the challenges of modern working.
In an era of work from anywhere, using any device, SSE provides the capability to secure access to your cloud services and data. Using a client installed to your end user device, (Windows, Android, Apple) traffic that needs to be secured can be routed to Global Secure Access cloud service. All other traffic is handled by your local internet breakout.
This blog post will focus on looking at Microsoft Entra Internet access component of SSE. We will look to cover the following topics,
- Overview Microsoft Entra Internet Access
- Getting started
- Traffic Forwarding Profiles
- Web Filtering Policies
- Security Policies
- Conditional Access
- Client Install
- Testing
- Useful Links
Overview
Microsoft provides an infographic illustrating the intended usage for Global Secure Access in the modern working era. Most working practices are either hybrid or remote, with workers having the potential to work from any location using any device.
Global Secure Access provides 3 traffic forwarding profiles that you can configure,
- Microsoft Traffic Profile – Internet traffic for Microsoft services
- Private Access Profile – Access to private resources
- Internet Access Profile – Internet access except for Microsoft Traffic Profile
We will focus on deploying and testing Global Secure Access – Internet Access in a test environment, assessing the technologies capabilities and provide guidelines when deploying in live or test customer environments.

Getting Started
To start using Entra ID Global Access you need to meet the following prerequisites,
- Appropriate permission to activate Global Secure Access
- Global Secure Access Administrator
- Security Administrator
- Global Administrator
- Appropriate license
- See licensing section of this document.
Licensing
Microsoft Entra Internet Access and Private Access and available as standalone products. They are also included in the Entra Suite product. The table below detail some of the licensing options and cost at the time of writing this blog post.
I have also included a link below to the licensing page, please consult for the latest licensing and pricing information.
| Product Name | Description | Price per User |
| Microsoft Entra ID P1 | Formerly Azure Active Directory P1, includes basic identity and access management features. | £4.50/user/month |
| Microsoft Entra ID P2 | Formerly Azure Active Directory P2, includes advanced identity protection and governance features. | £6.80/user/month |
| Microsoft Entra Suite | Combines network access, identity protection, governance, and identity verification solutions. | £9.00/user/month |
| Microsoft Entra Internet Access | Secure access to all internet and SaaS apps with an identity-centric secure web gateway. | £4.10/user/month |
| Microsoft Entra Private Access | Secure access to private apps from anywhere, replacing legacy VPNs with Zero Trust Network Access. | £4.10/user/month |
Activate
Once you have the appropriate permission and license you need to activate Global Secure Access in your tenant. Navigate to entra.microsoft.com > Global Secure Access.
Under step 2 Activate Global Secure Access in your tenant click on the activate button, highlighted in the example below.

Once activated you are now ready to delve into the world of Global Secure Access.
Traffic Profiles
Global Secure Access provide 3 different traffic forwarding profiles that you can enable,
- Microsoft traffic profile
- Internet traffic to Microsoft service
- Private access profile
- Access to private resources
- Internet access profile
- All internet traffic – except traffic to Microsoft Service

In this blog we will focus on configuring Internet Access Profile and look at how we can control Internet traffic using this technology.
In my test environment this is the only profile enabled at this time.
The next step in the process is to configure your web filtering policies.
Web Filtering Policies
To access the web filtering policies expand Global secure access > Secure > Web content filtering polices. Here you have the option to create a new policy or edit existing policies.
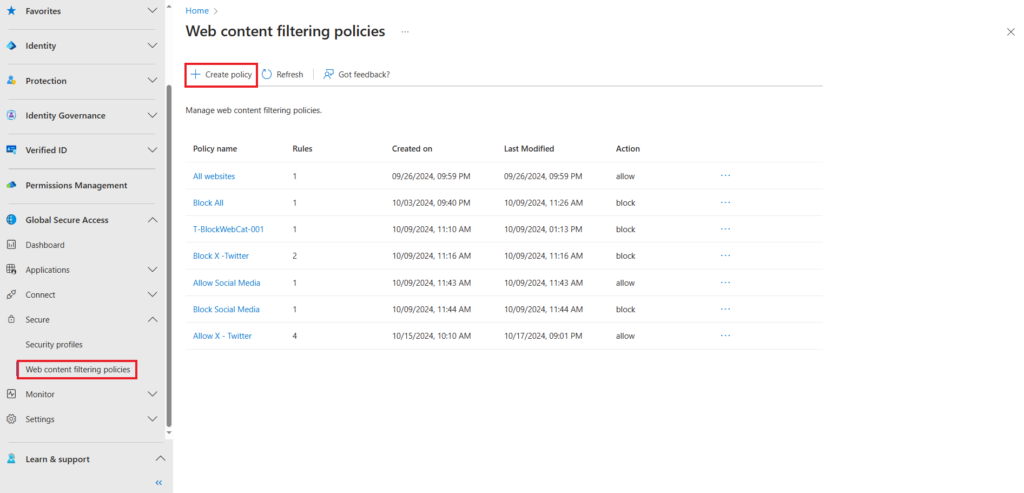
All websites, allow rule is a default rule that we have kept in this example. it can be deleted if not required as part of your rule set.
We will create a new web content filtering policy as part of this demo.
Creating a new web filtering policy
Select create a new policy and complete the basic information page. the page will ask for,
- Name
- Description
- Action
- Block
- Allow
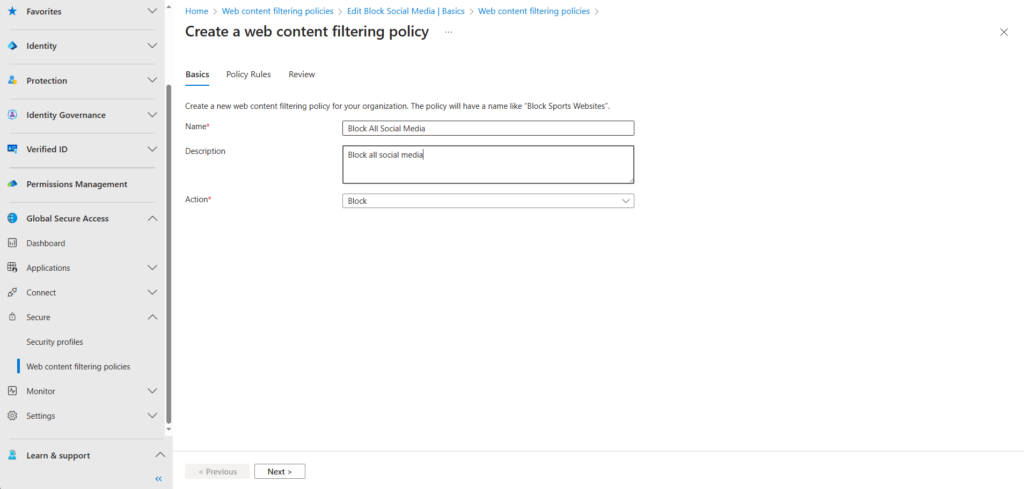
On the following page select add a rule,
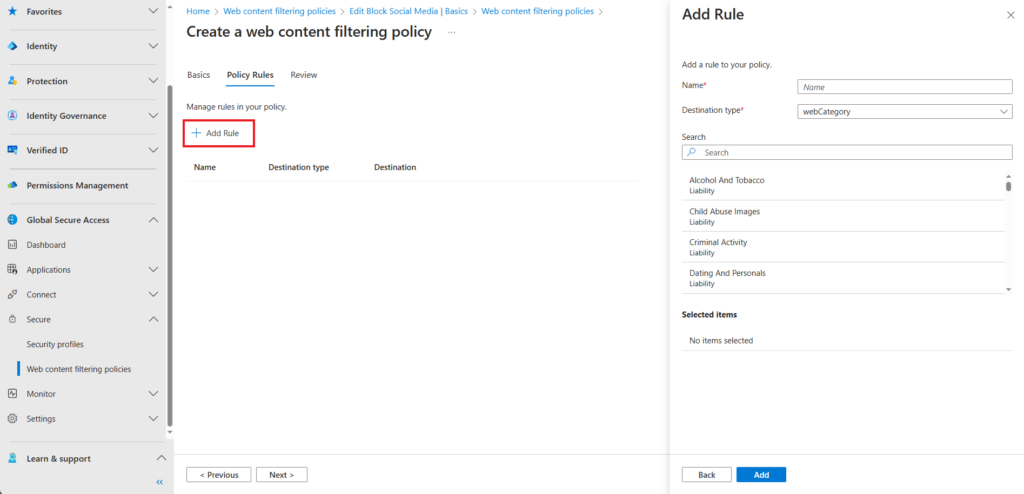
Give your rule a name and select a destination type.
There are 2 types of rules (destination types) you can configure,
- WebCategory
- fqdn
In our example we will configure a webCategory rule. Select the category(s) you want to block. In this example we are blocking all social networks. When you have selected all your categories click on the add button.
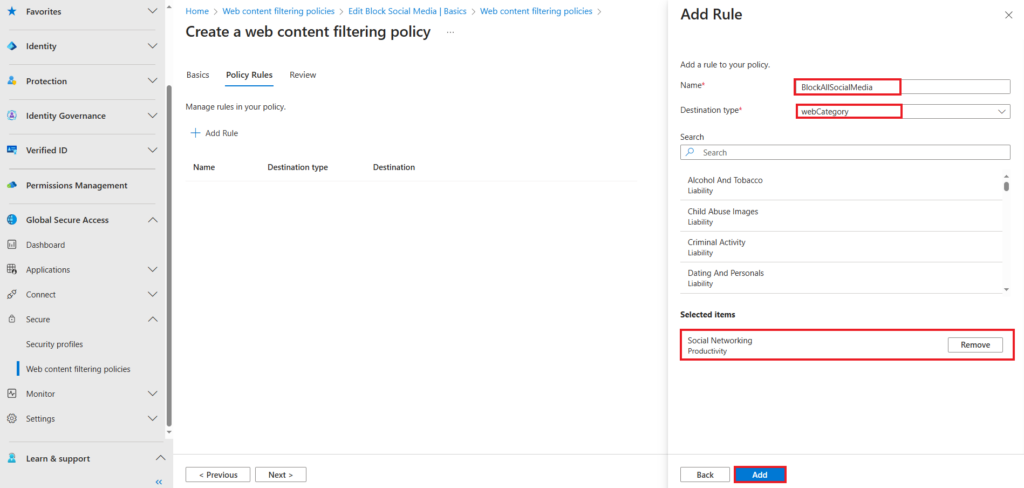
On the review page, click create policy if you are happy with your configuration.
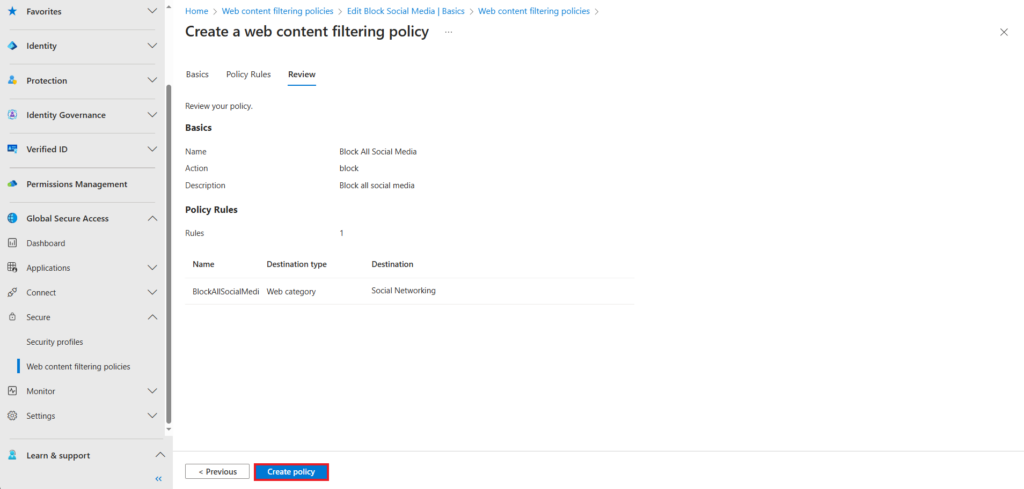
You can create multiple web filtering policies based on the needs of your organisation.
The next step is to create security profiles.
Security Profiles
In our example we will create a security profile that blocks a users access to all social media platforms.
To create a security policy expand Global secure access > Secure > Security profiles. Here you have the option to create a new policy or edit any existing policies.
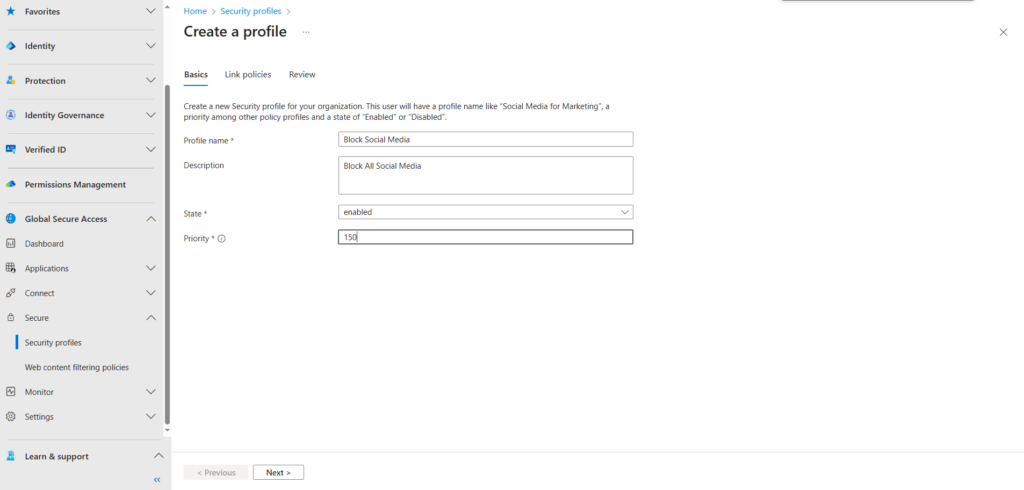
On the Basics page complete the following details,
- Profile name
- Description
- State
- Priority
- Create an appropriate priority and allow for future changes/growth.
- Priority can be set been 100 – 65,000.
65,000 is a special priority, when applied it will be applied to everyone without linking it to any conditional access policy.
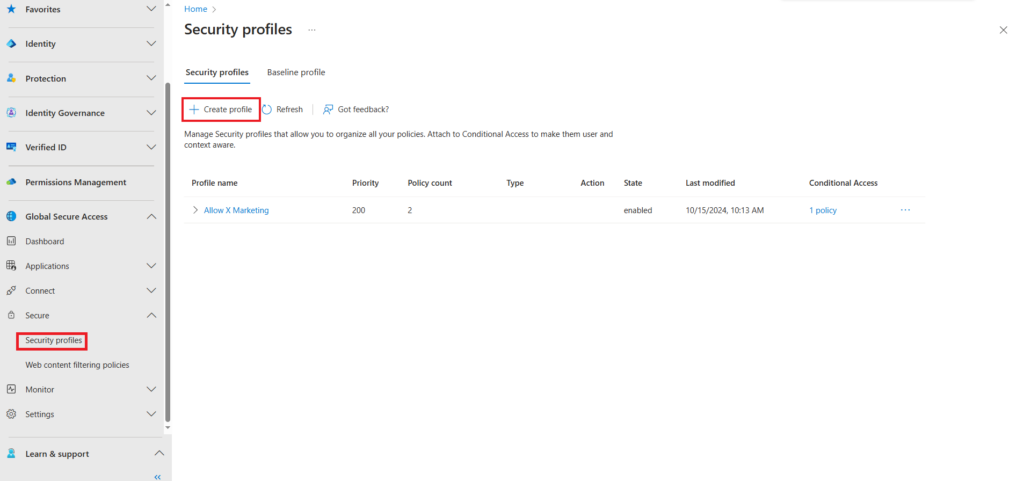
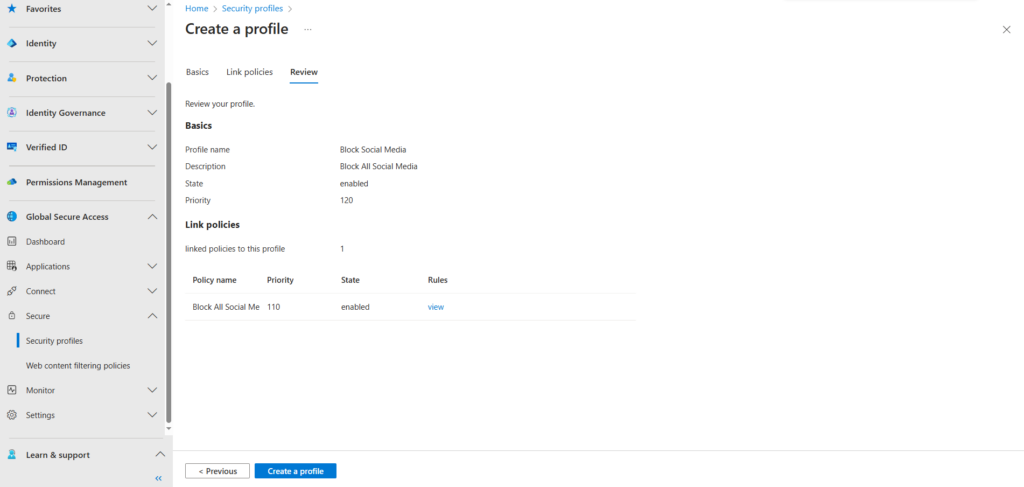
Fill in the basic information.
Priority starts at 100. In our example we are setting the priority to 120.
We have a security profile with the priority level of 110. Setting this profile at 120 grants us the flexibility to create additional profiles with a higher priority if needed.
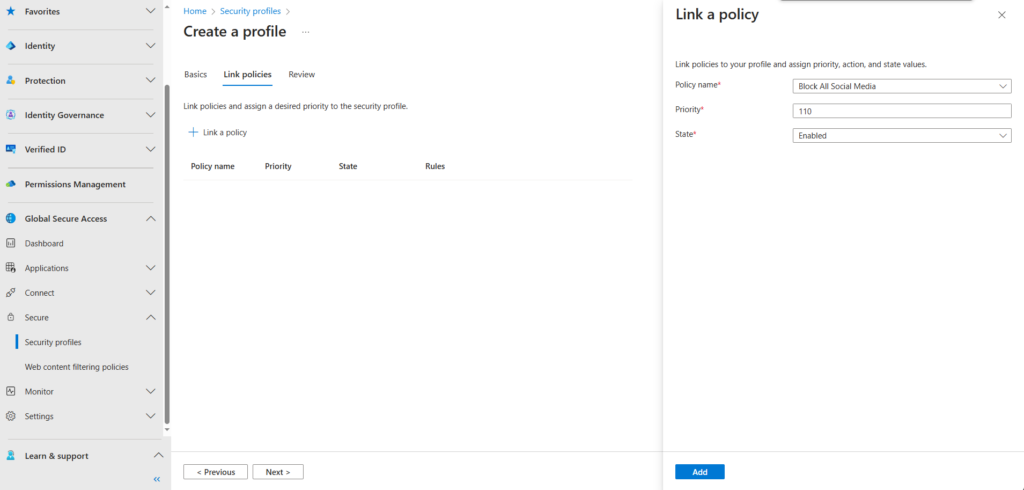
On the link policies page we will link an existing policy and give the policy a priority if 110.
Multiple web content filtering policies can be linked to the same security profile
On the review page, review your configuration and click create a policy when you are happy with your configuration.
Conditional Access
The next step is to create a conditional access policy and link the security profile we just created to the conditional access policy.
If you are new to Azure and want a quick overview on conditional access, you can review an earlier blog post on Entra ID Security, where i cover conditional access at a very high level.
In the Microsoft Entra Admin Centre navigate to Protection > Conditional Access and select Policies. For this demo we will create a new policy.
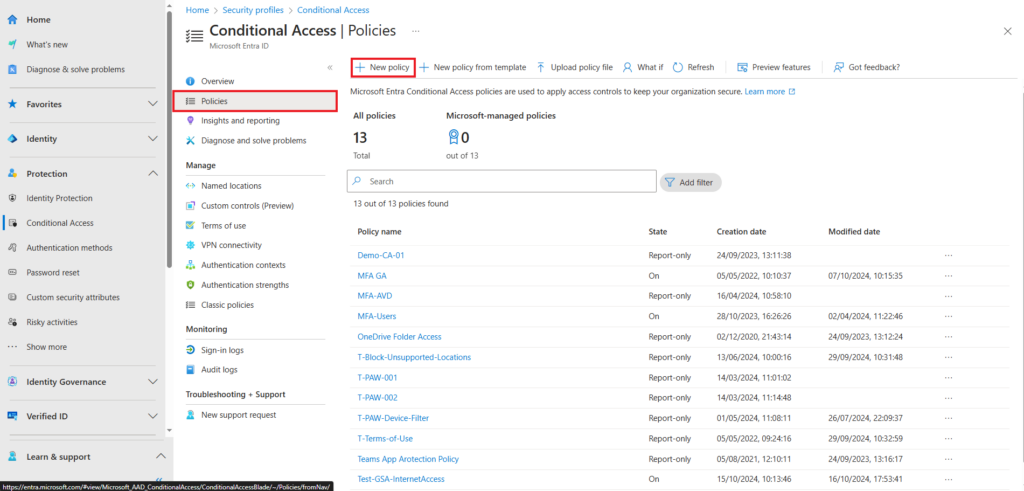
When creating a new conditional access policy we will provide the following details,
- Name
- Give your conditional access policy a name
- User
- Target users or groups
- For our example we will target a single test user
- Target resource
- Select resources – Internet resources with Global Secure Access
- Session
- Use Global Secure Access Security profile
- We will use the newly created Block Social Media profile
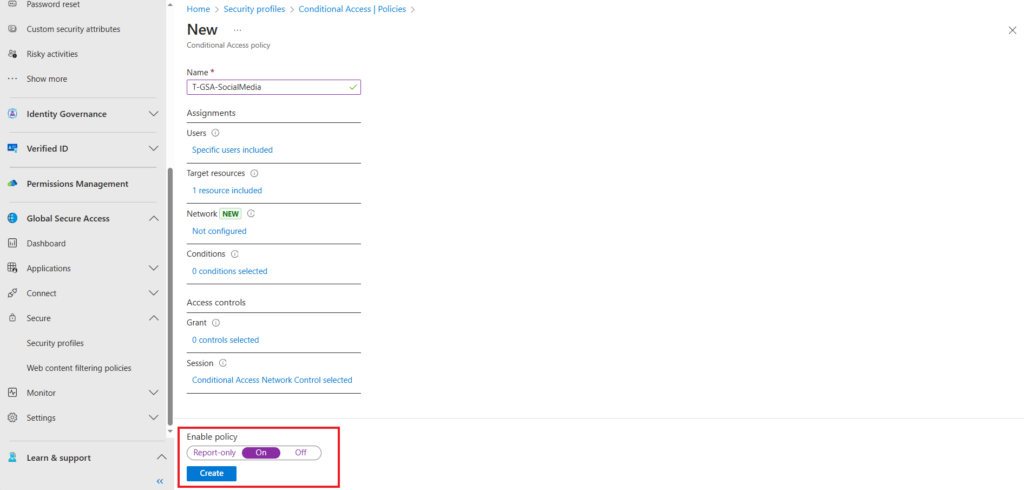
On the New conditional access policy page name the policy and under users select the target users or groups,
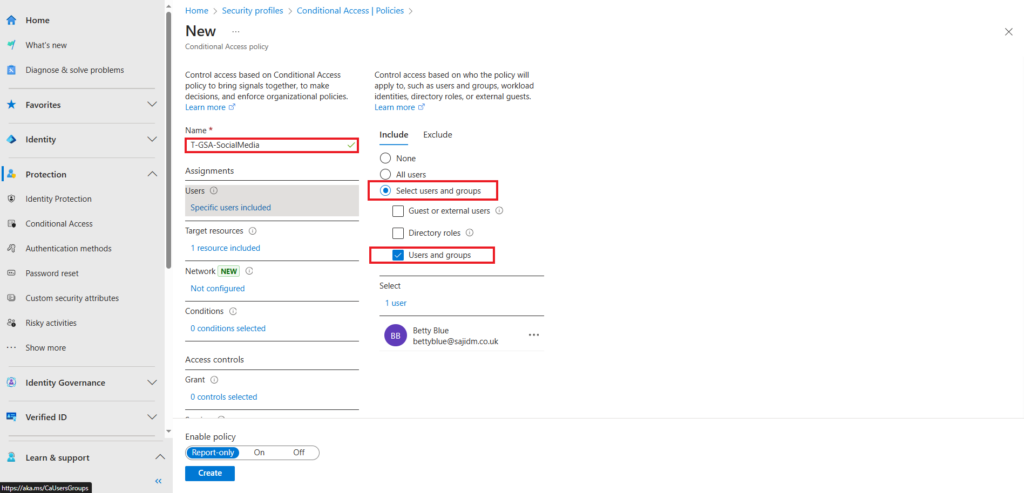
For target resource click the select resources radio button and select Internet resources with Global Secure Access as the resource

For session configure Use Global Secure Access security policy, from the drop down menu select the security profile you created earlier.
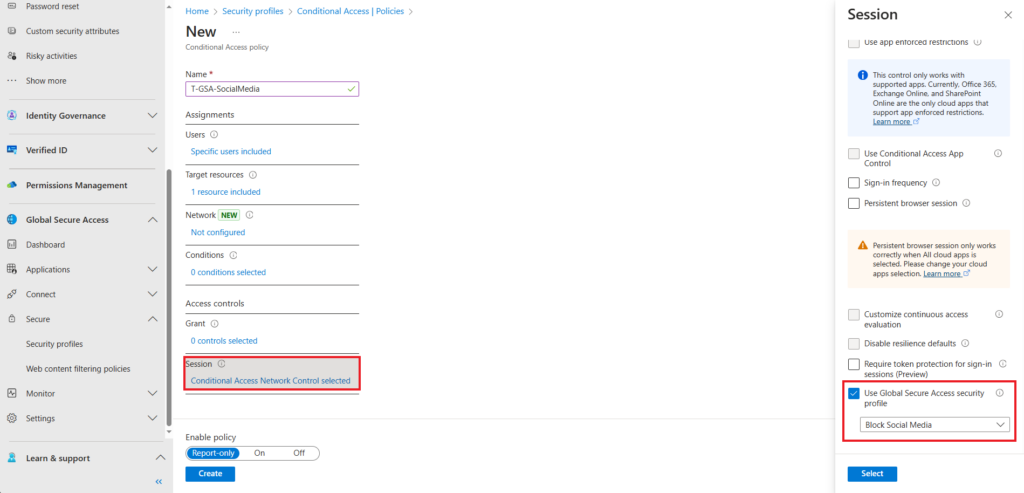
Enable the policy and and click create
Linked Conditional Access Policy
The conditional access policy will be listed as a linked conditional access policy to the traffic forwarding internet access profile .
From Global Secure Access > Connect > Traffic forwarding > Internet access profile you can view all linked Conditional Access policies,
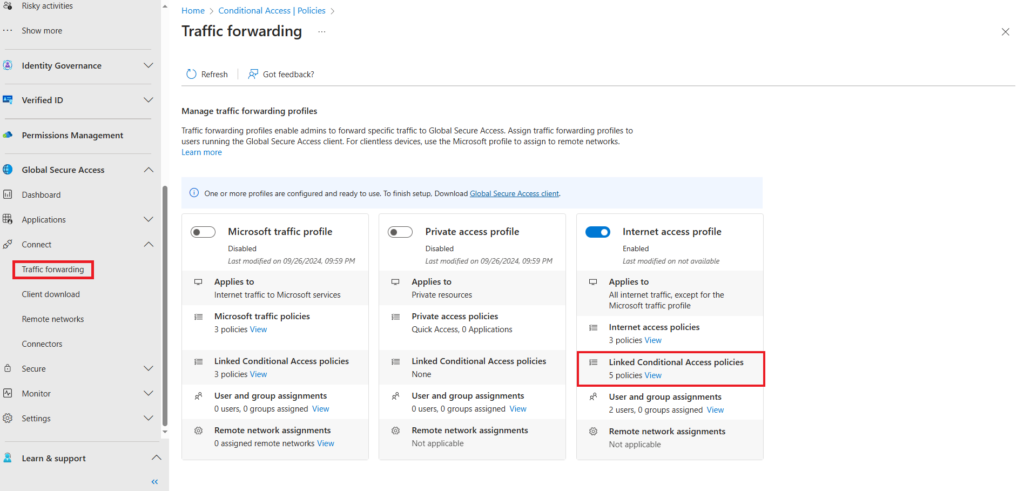
T-GSA-SocialMedia will be displayed as a linked conditional access policy

User and Group Assignments
In traffic forwarding, internet access profile below Linked Conditional Access policies you have the option for User and group assignments. The user(s) or group(s) that are the target of your Internet access profile need to be added here.
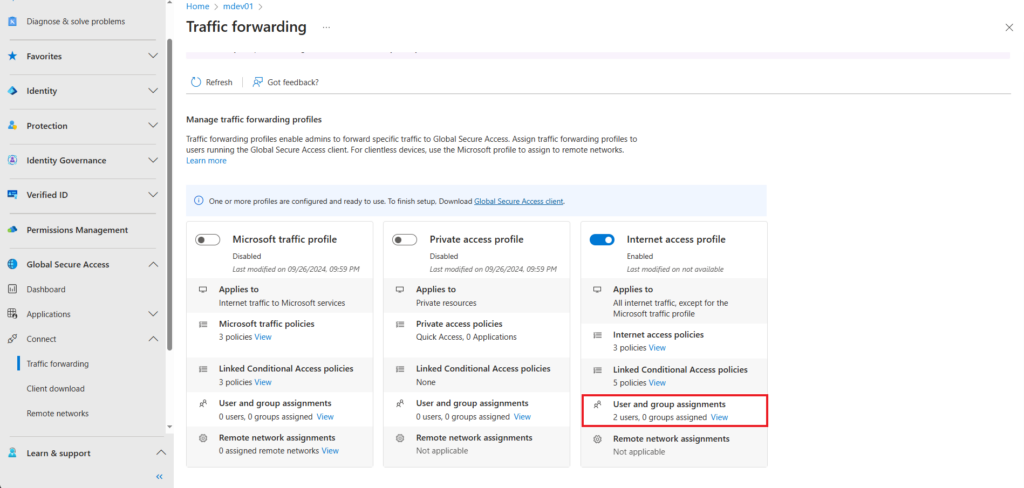
Below selected users > Assigned click on the link
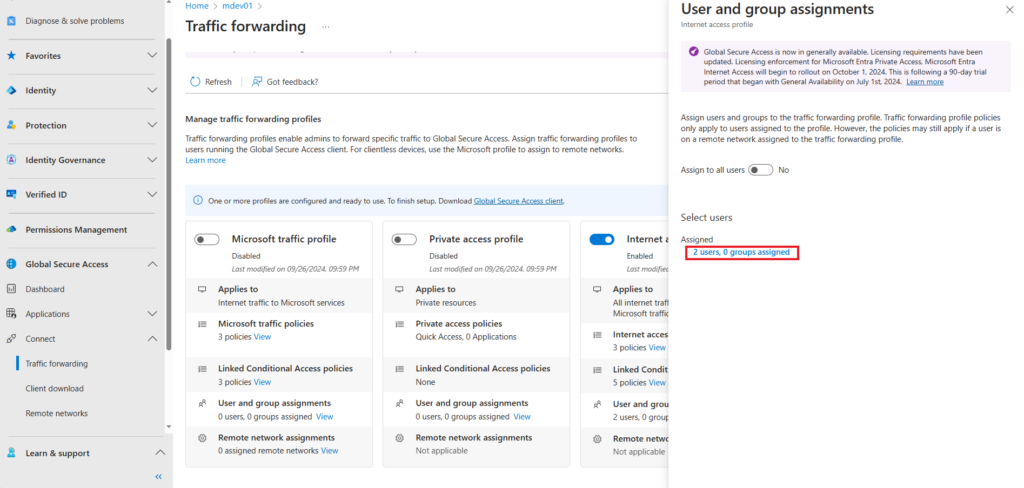
In my example i have added 2 test user accounts for testing.
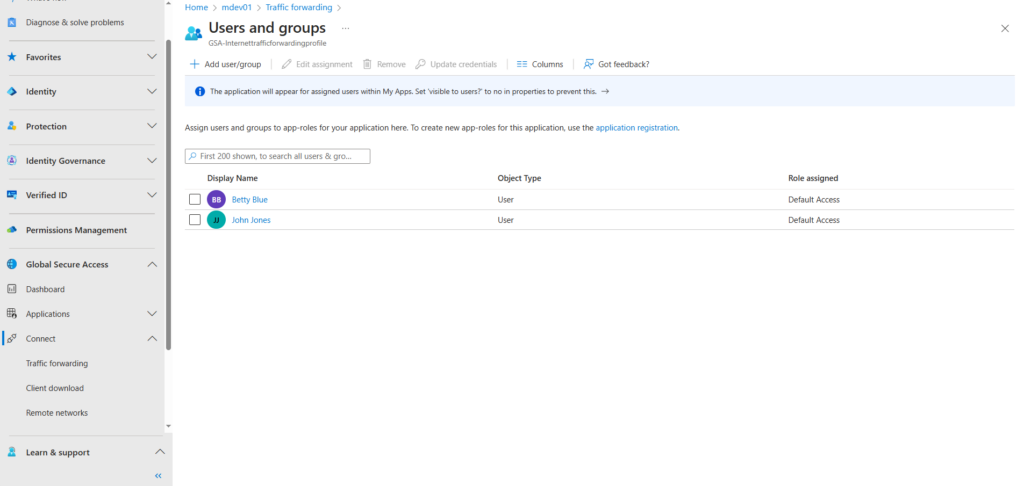
The next step would be to install the client on your test device. We will step through the installation of the client for Windows.
Client Install
To install the client navigate to Microsoft Entra Admin Center > Global Secure Access > Connect > Client Download
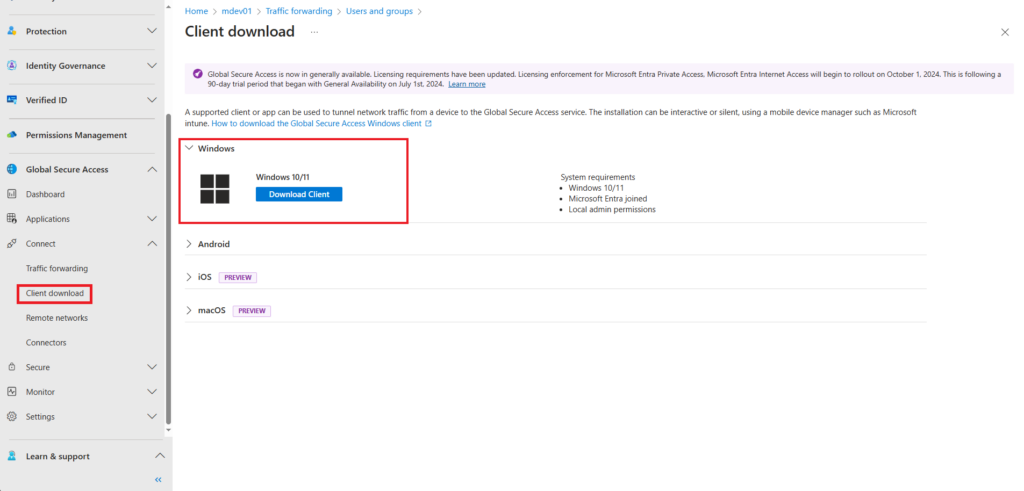
As you can see there are client available for,
- Windows
- Android
- iOS
- macOS
In our example we will be downloading and installing the Windows client on a test VM running Window 10 within a Hyper-V environment.
Once downloaded on your test machine run the installer,

Accept the agreement and install
Once installed, the client may take a little time to connect.
Once connected the Global Secure Access client icon in the system tray will have a green tick, illustrated connected.

Right clicking the icon gives you the following options,
- Disable
- Enable
- Collect Logs
- Advanced Diagnostics
Selecting advanced diagnostics, opens up the overview page for the Global Access Client. The health check page will at a glance show you the current status of the client and if there are any issues.
The screen shot below illustrates the output from the health check screen of the client.

As you can see all health indicators are green.
Within the advanced diagnostics screen you also have access to,
- Overview page
- Forwarding profile
- Hostname acquisition
- Traffic
- Advanced log collection
We will take a look at some of this capability in future posts.
Testing
To test our configuration we will open a web browser on the Windows 10 test Virtual Machine we installed the Global Secure Access Client and try accessing a social media site.
When trying to access X (formally Twitter) you will be presented with the following page
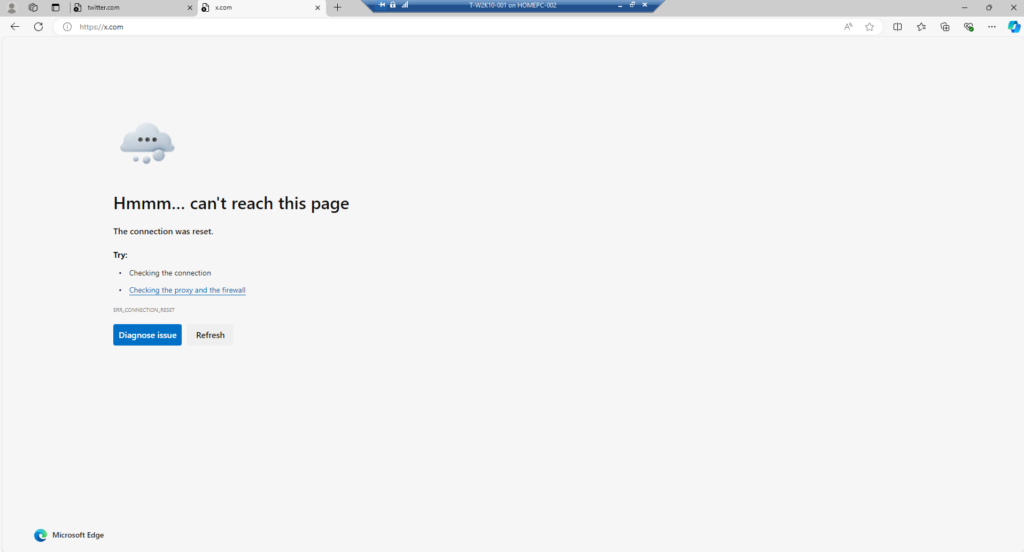
When accessing non social media sites, the access is allowed.
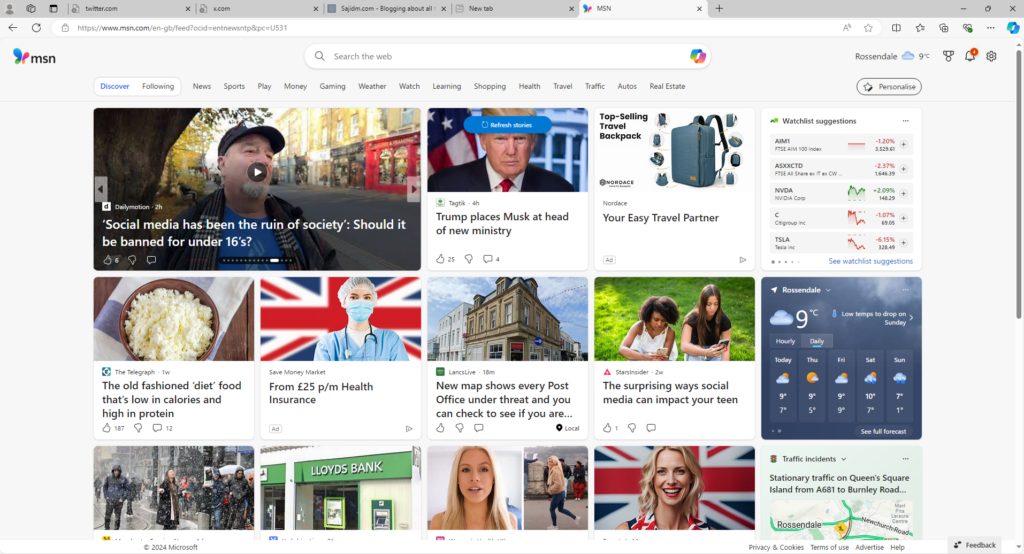
All non restricted internet access is routed out of your local internet breakout.
Logs
You can also confirm if your rule(s) is working by navigating to Global Secure Access > Monitor > Traffic logs
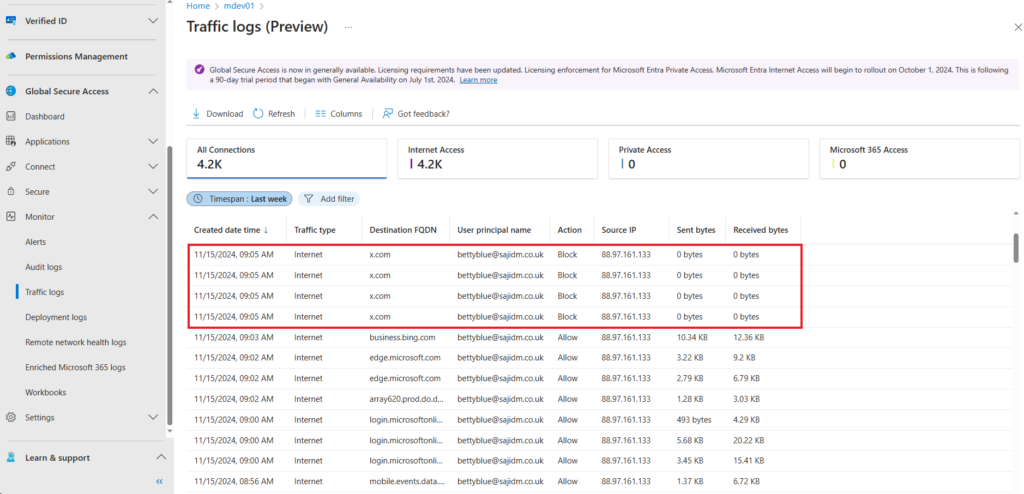
As you can see www.x.com is blocked for our test user account, but other internet traffic is allowed.
Final Thoughts
Global Secure Access – Internet Access, can be used to block or allow access to websites based on the rules you create.
Priorities can be configured within the security policy to resolve conflicts when multiple security policies are targeted at the same users or groups
Priorities are also applied to web content filtering policies to resolve conflicts with security profiles. Multiple web content filtering policies can be linked to a single security profile.
Conditional Access policy can be configured to use one security profile.
In our next blog post we will look at configuring and testing the Global Secure Access Microsoft Traffic Profile.
Useful Links
What is Global Secure Access? – Global Secure Access | Microsoft Learn
Global Secure Access documentation – Global Secure Access | Microsoft Learn
Learn about Microsoft Entra Internet Access – Global Secure Access | Microsoft Learn
